- ArcSinH is divided into three groups. The HDR Pre-Stretch Scale controls are used to map the image to different parts of the ArcSinH stretch curve. Mapping the image data to different parts of the stretch curve allows great control over the brighness and contrast of the stretch applied to the background, midtones, and highlights. The Stretch control group is used to control the shape of the stretch function and also background brightness and contrast. The Decompress Color controls are used to maintain star color that is compressed by aggressive stretch functions.
- ArcSinH and digital development stretch tools both have the same color decompression and HDR pre-stretch scale functions. ArcsinH uses a different stretch curve than digital development and may perform better on some images.
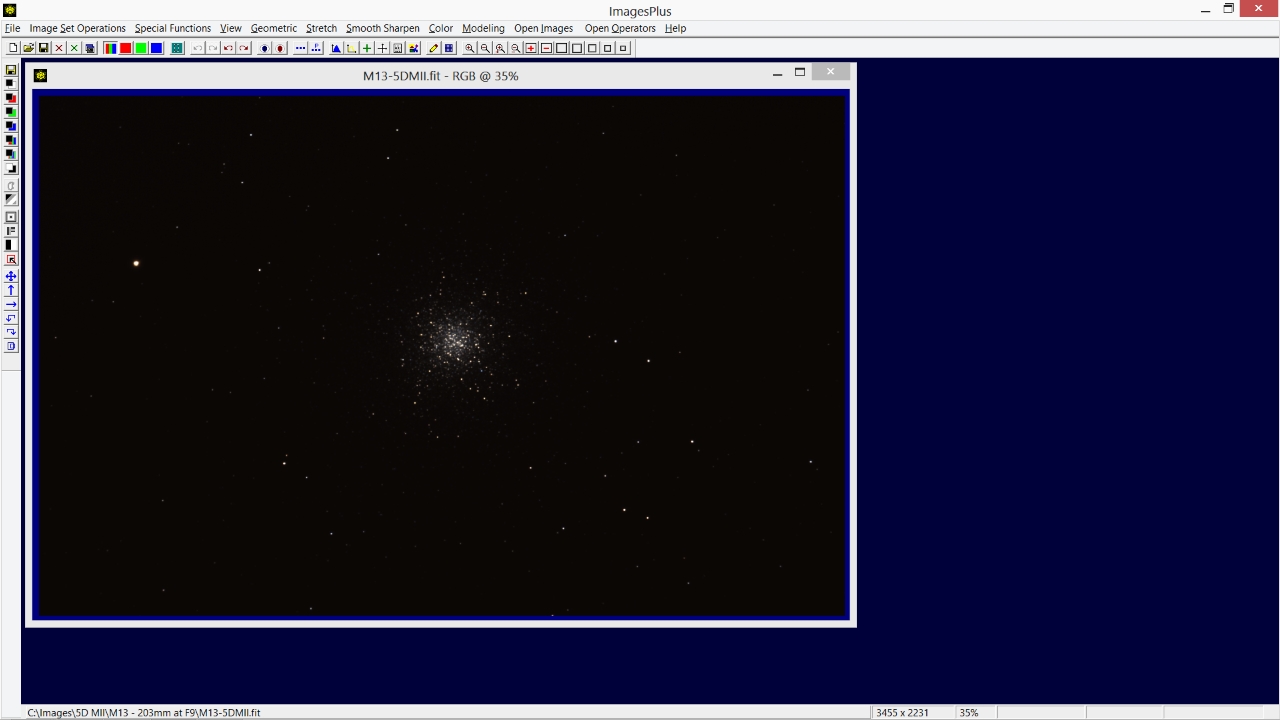
- A set of 17 x 10 minute light frames, 10 flat, 10 dark, and 10 bias frames of M13 were collected using a 203mm F9 TMB reduced to F7 with a Canon 5D MII. After calibration the light frames were normalized, aligned, and stacked with excluded min max average using the methods described by DSLR Automatic Image Set Processing or CCD Automatic Image Set Processing.
- The stacked image of M13 is very dark and shown below. The goal is to brighten or stretch the image of M13 so that the faint outer stars are shown and the bright core is not over stretched. Star color is also increased.
- Color deompression is used directly with the stacked color image from a DSLR or one shot color CCD. To use color decompression with red, green, and blue stacked components from a monochrome CCD build a color RGB image from the components. Apply ArcSinH with color decompression to the RGB image then add the luminance layer on top. See the tutorial that covers multiple luminance layers for layering details.
- Special thanks to Roy Wellington for beta testing the ArcSinH function and his input.
Initial very dark stacked color image of M13. The dark background will be stretched to show faint outer stars without over stretching the bright core. Star color will be increased.
 |
Step 1
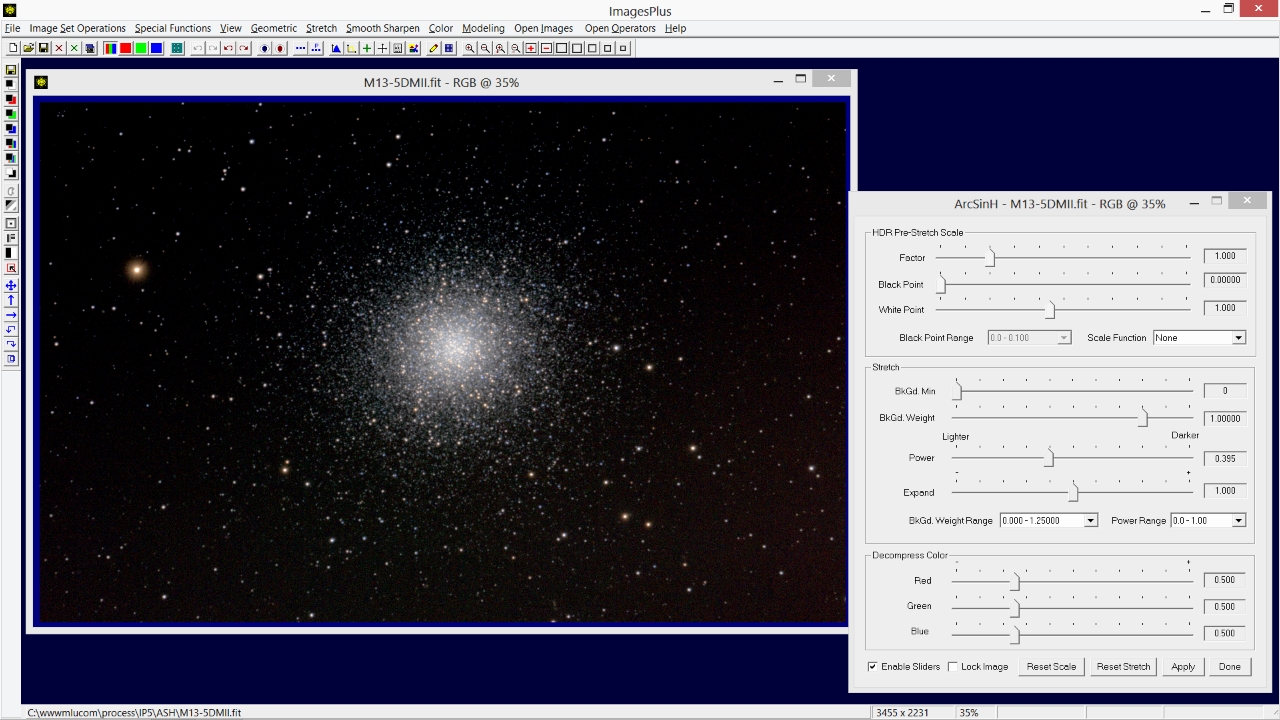
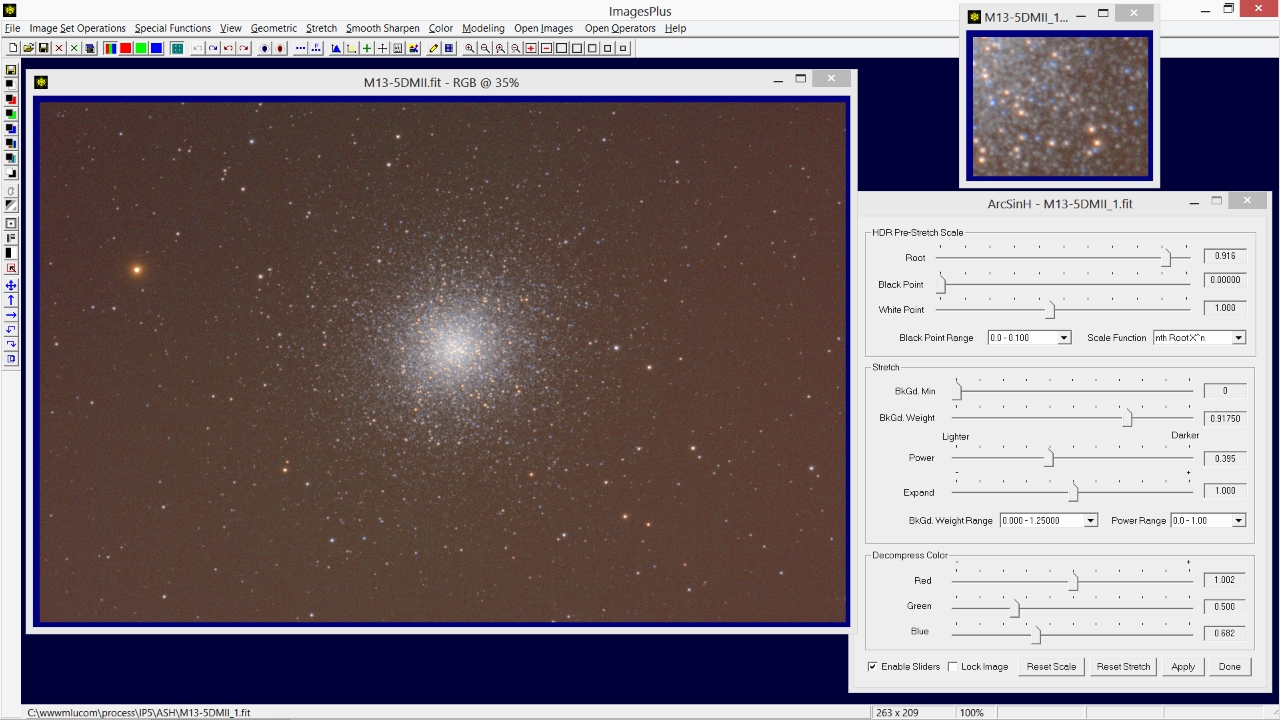
- The Stretch | ArcSinH function is used to increase brightness and contrast of the dark background without over stretching the bright core of M13.
- First move the Power slider to the left until the bright core looks properly stretched. At this point only focus on the bright core.
Power is set to 0.395. If the Power slider is too sensitive for a given image then use the Power Range list to adjust slider sensitivity to match the image.
 |
Step 2
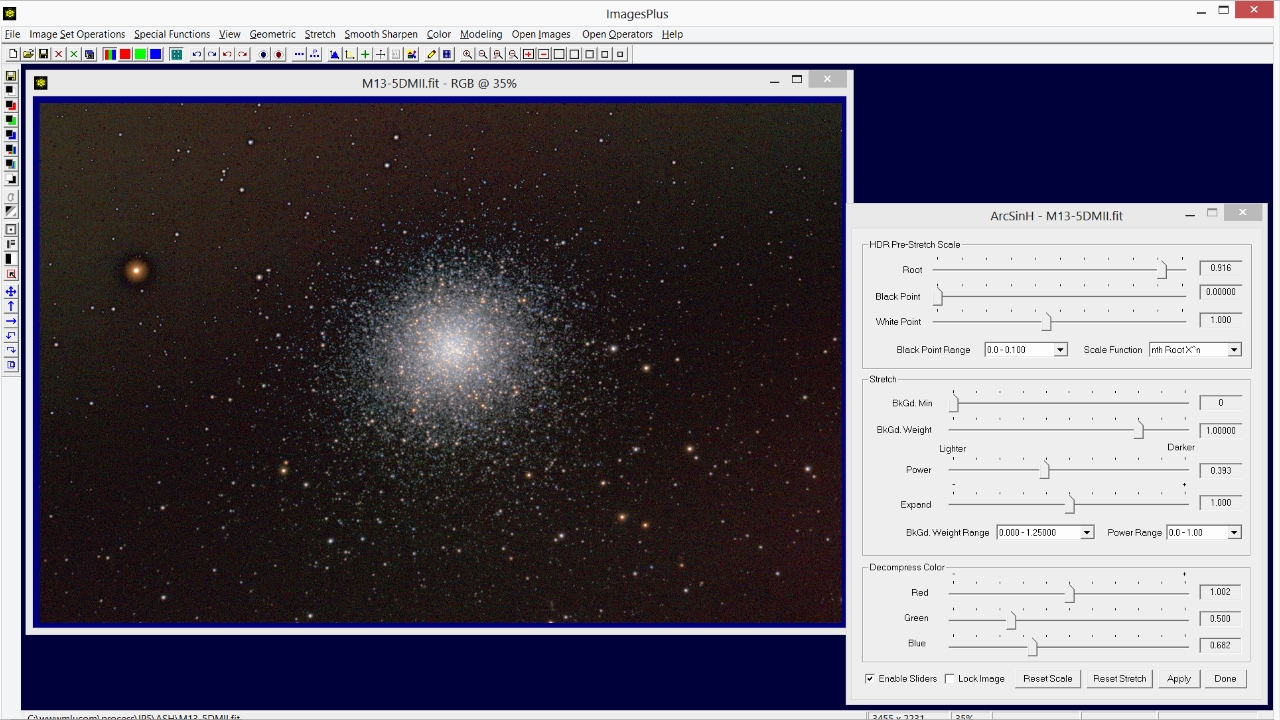
- The controls in the HDR Pre-Stretch Scale group will be used next to increase the stretch applied to M13 and the background stars. A linear pre-stretch scale could be used but both the background and core would be be increased in brightness. The faint outer stars of M13 require much more of a stretch than the core so a Nth Root pre-stretch scale is used to boost the outer area of M13 and maintain the core stars. Color is compressed by the aggressive stretch. Step 4 below will show how to decompress color.
Nth Root pre-stretch scale is used with Root = 0.916. As a result background star brightness is increased with an increase of contrast. Very little additional stretch is applied to the core of M13.
 |
Step 3
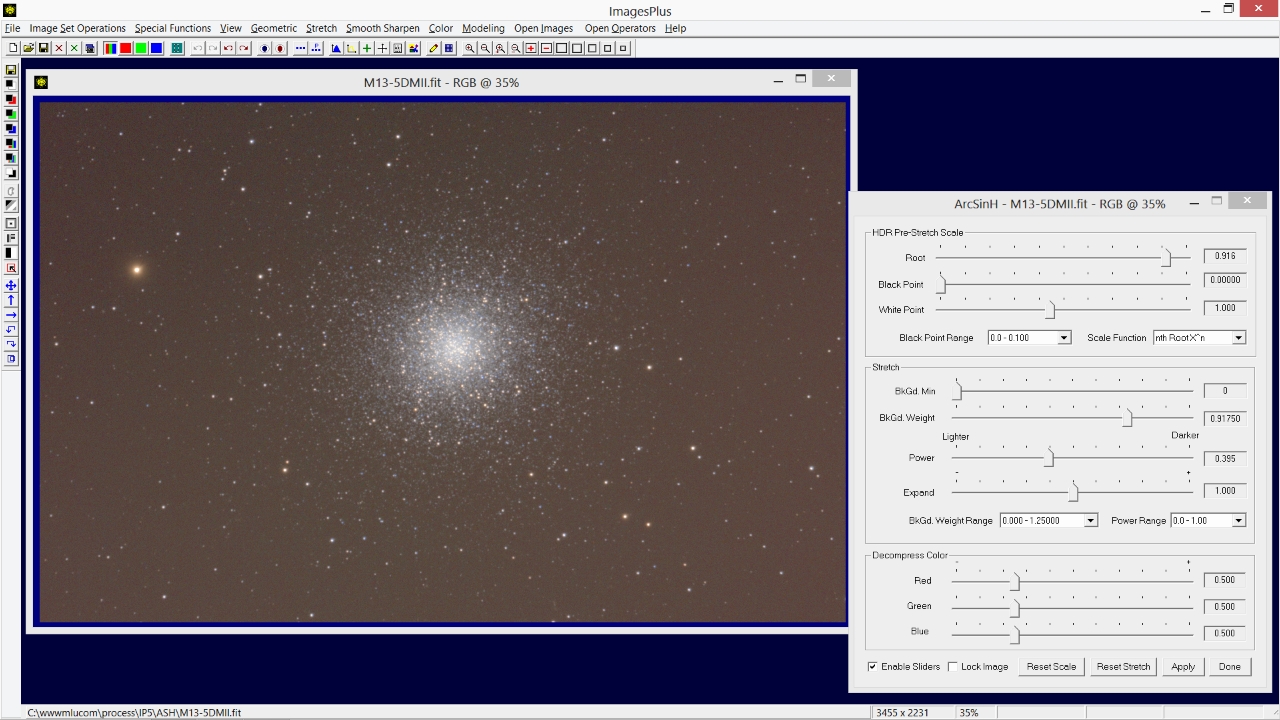
- Next adjust the Background Weight slider in the ArcSinH Stretch control group to the left to even the background all the way to the image edge.
The Background Weight slider has been moved to the left to 0.91750 to even the background. If the slider is too sensitive use the Background Weight Range list box to adjust the slider sensitivity to match the image. The stretched image now shows faint outer stars and color.
 |
Step 4
- The Decompress Color controls are used next to counter color compression from the aggressive ArcSinH stretch.
Color decompression preserves color present in the initial stacked image and does not add new color. Red and blue are enhanced by moving their sliders to the right since red and blue are the dominate colors in this image of M13. The green slider has little effect since the M13 image has very little green. Adjust the red, green, and blue sliders to get good color without artifacts. Check the color adjustment using a full resolution crop.
 |
Step 5
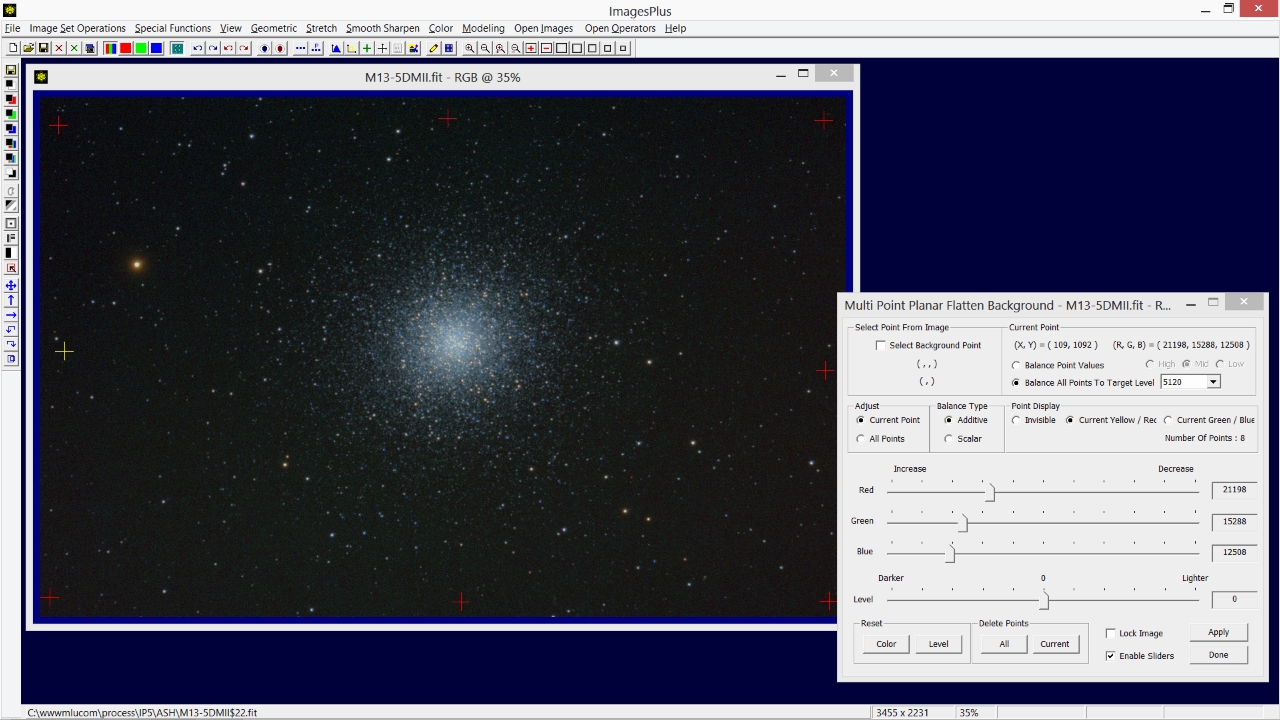
- The Special Functions | Multi-Point Flatten tool is used to color balance, flatten, and set the red background to dark gray.
Check the Select Background Point box then left-click on the image to select several background points. The color near each point is balanced. To automatically flatten each color balanced point to the same level select the Balance All Points To Target Level option. The default target level is dark gray or 5120 on a 16 bit scale. Color balance and level of each adjustment point can also be adjusted manually using the red, green, blue, and level sliders.
 |
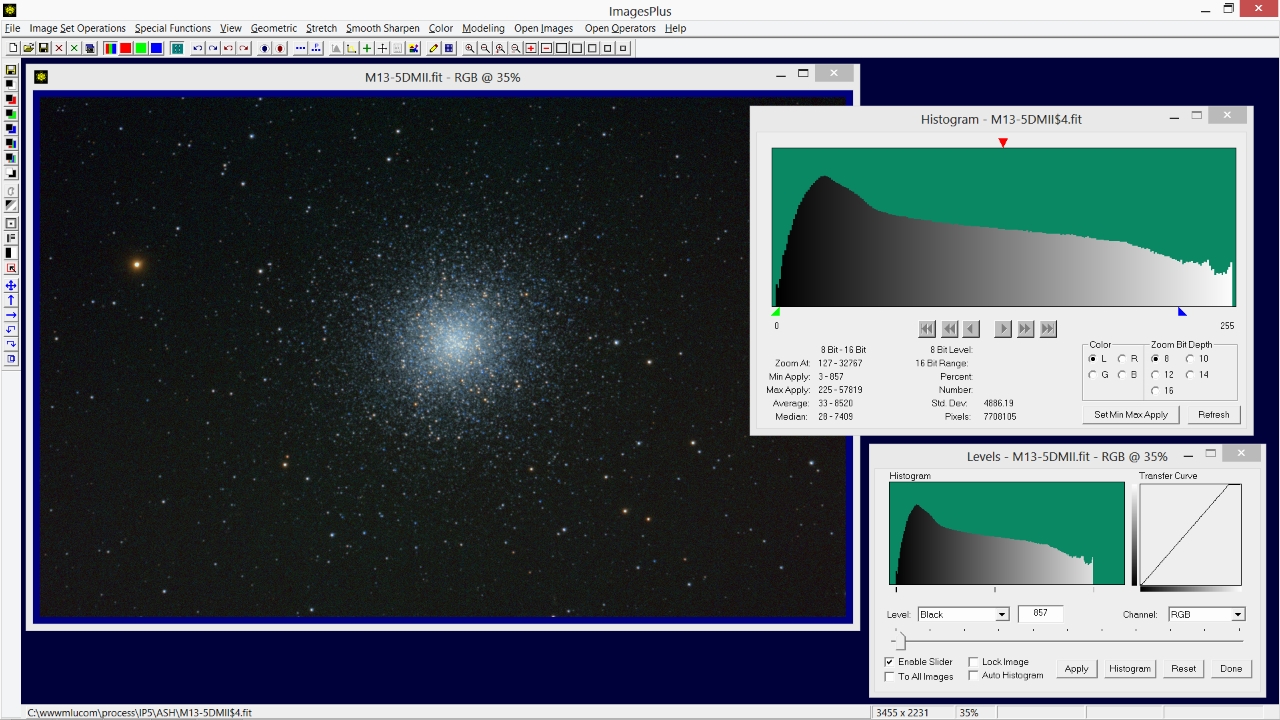
Step 6
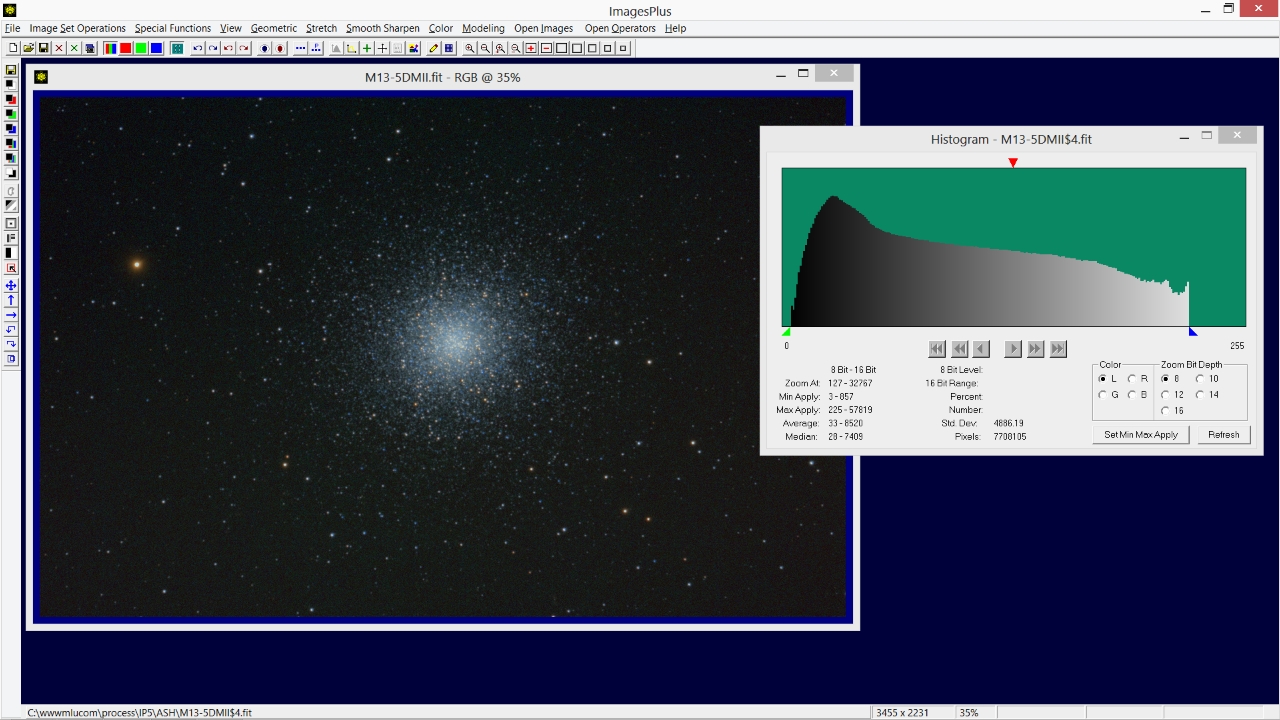
- The Modeling | Histogram tool is used to inspect pixel distribution after ArcSinH and flatten.
The left and right sides of the histogram do not extend to 0 black and 255 white, respectively.To set the black point green triangle left-click under the histogram at its left edge. To set the white point blue triangle right-click under the histogram at its right edge. Press the Set Min Max Apply button to open the tool selection window.
 |
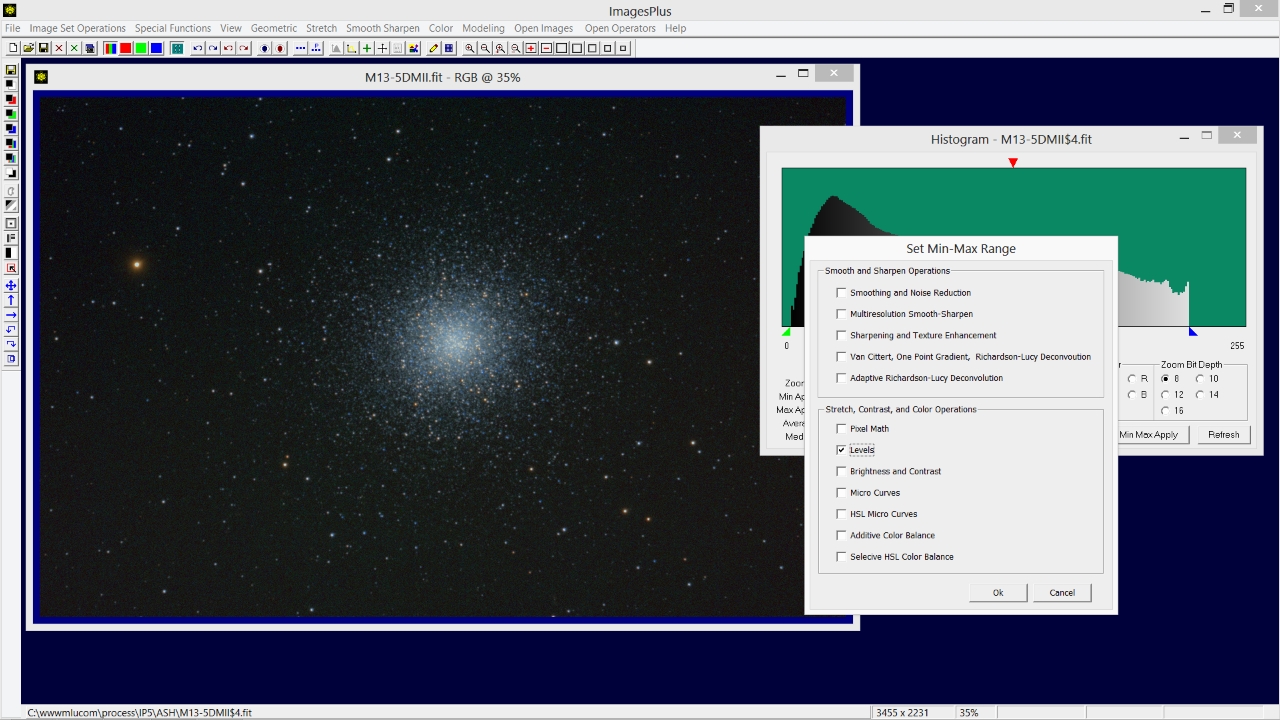
Check Levels then press Ok.
 |
Step 7
- The Stretch | Levels tool is opened and set to the black and white points selected on the histogram in the previous step.
Press Apply on the Levels tool to correct the black and white points. The histogram now extends from left black = 0 to white = 255.
 |
Step 8
- Smooth the background using the Multiresolution Smooth-Sharpen tool.
Finest and fine background levels are smoothed using a feather radius of 2523 and luminance range with minimum and maximum apply levels of 0 and 13510.
 |
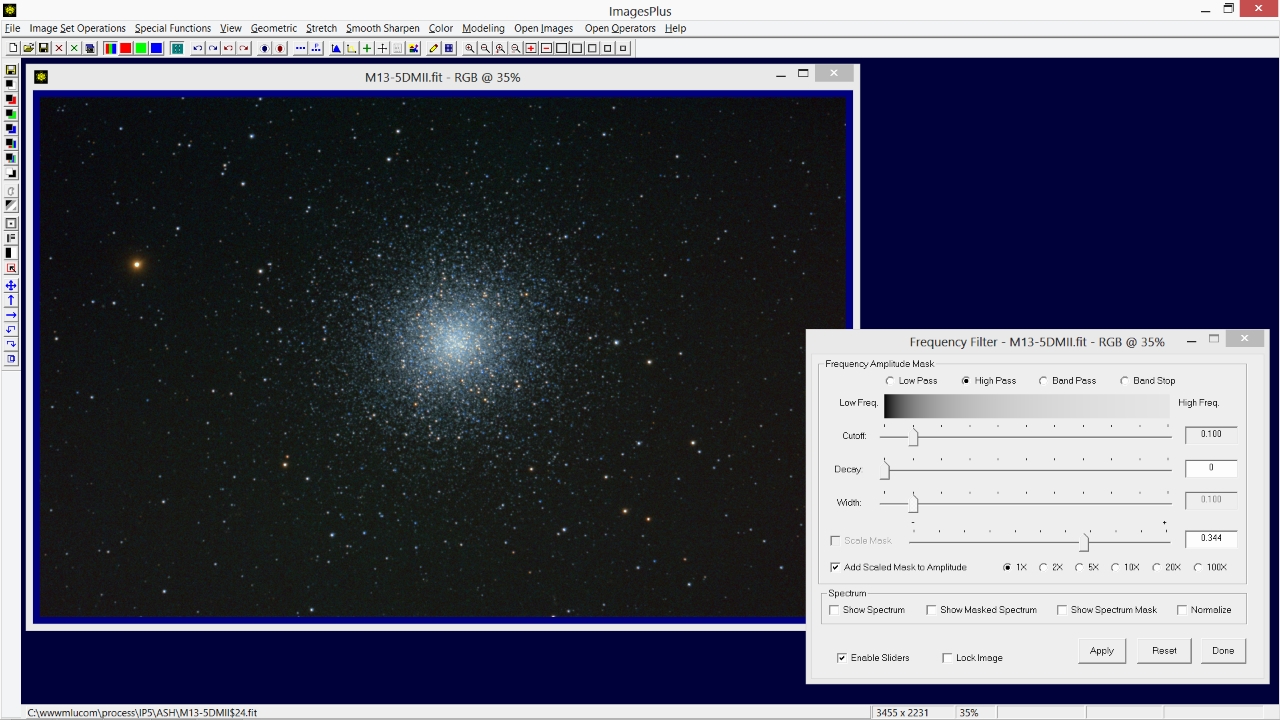
Step 9
- Sharpen stars with the Smooth-Sharpen | Frequency Filter tool.
Stars are sharpened using the high pass filter option with Add Scaled Mask to Amplitude option checked and slider set to 0.344. As a result stars which are higher frequncy objects are sharpened since their frequency amplitudes are increased.
 |
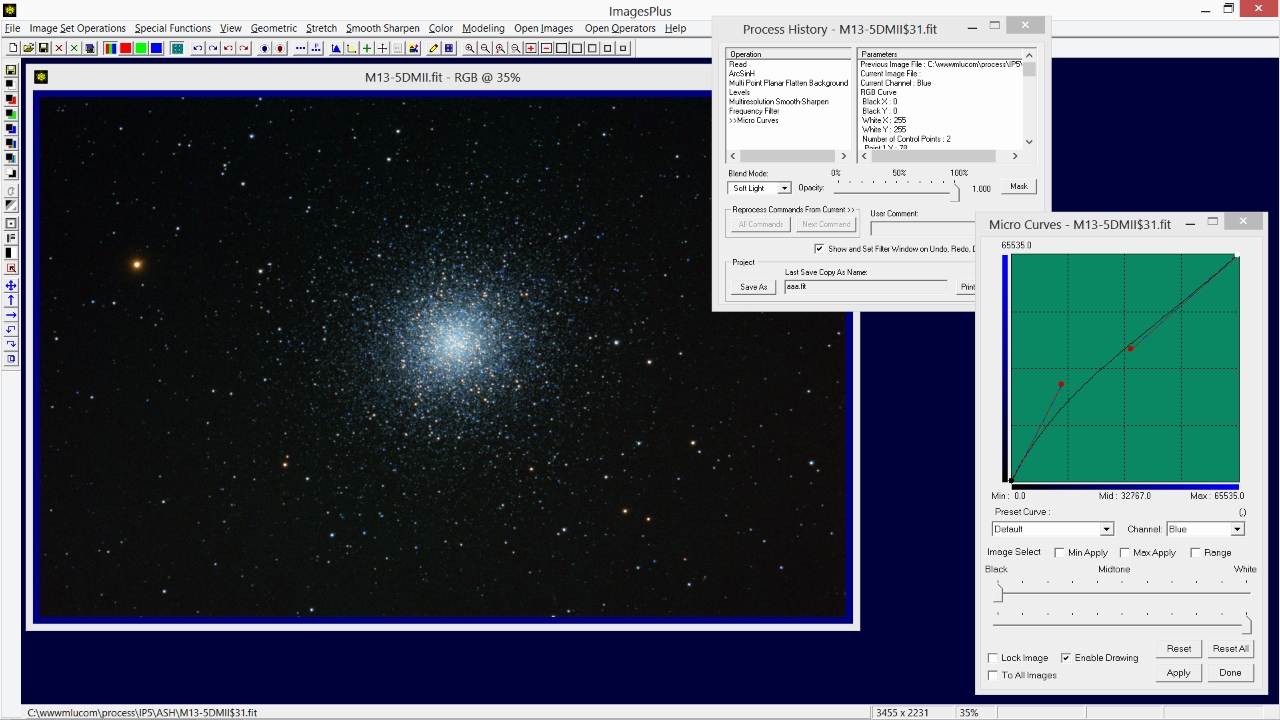
Step 10
- Optional contrast and color increase using the Stretch | Micro Curve tool.
Contrast and overall color is increased using the luminance curve with soft light blend mode set on the Process History window.
 |
Blue increase also with soft light blend mode.
 |
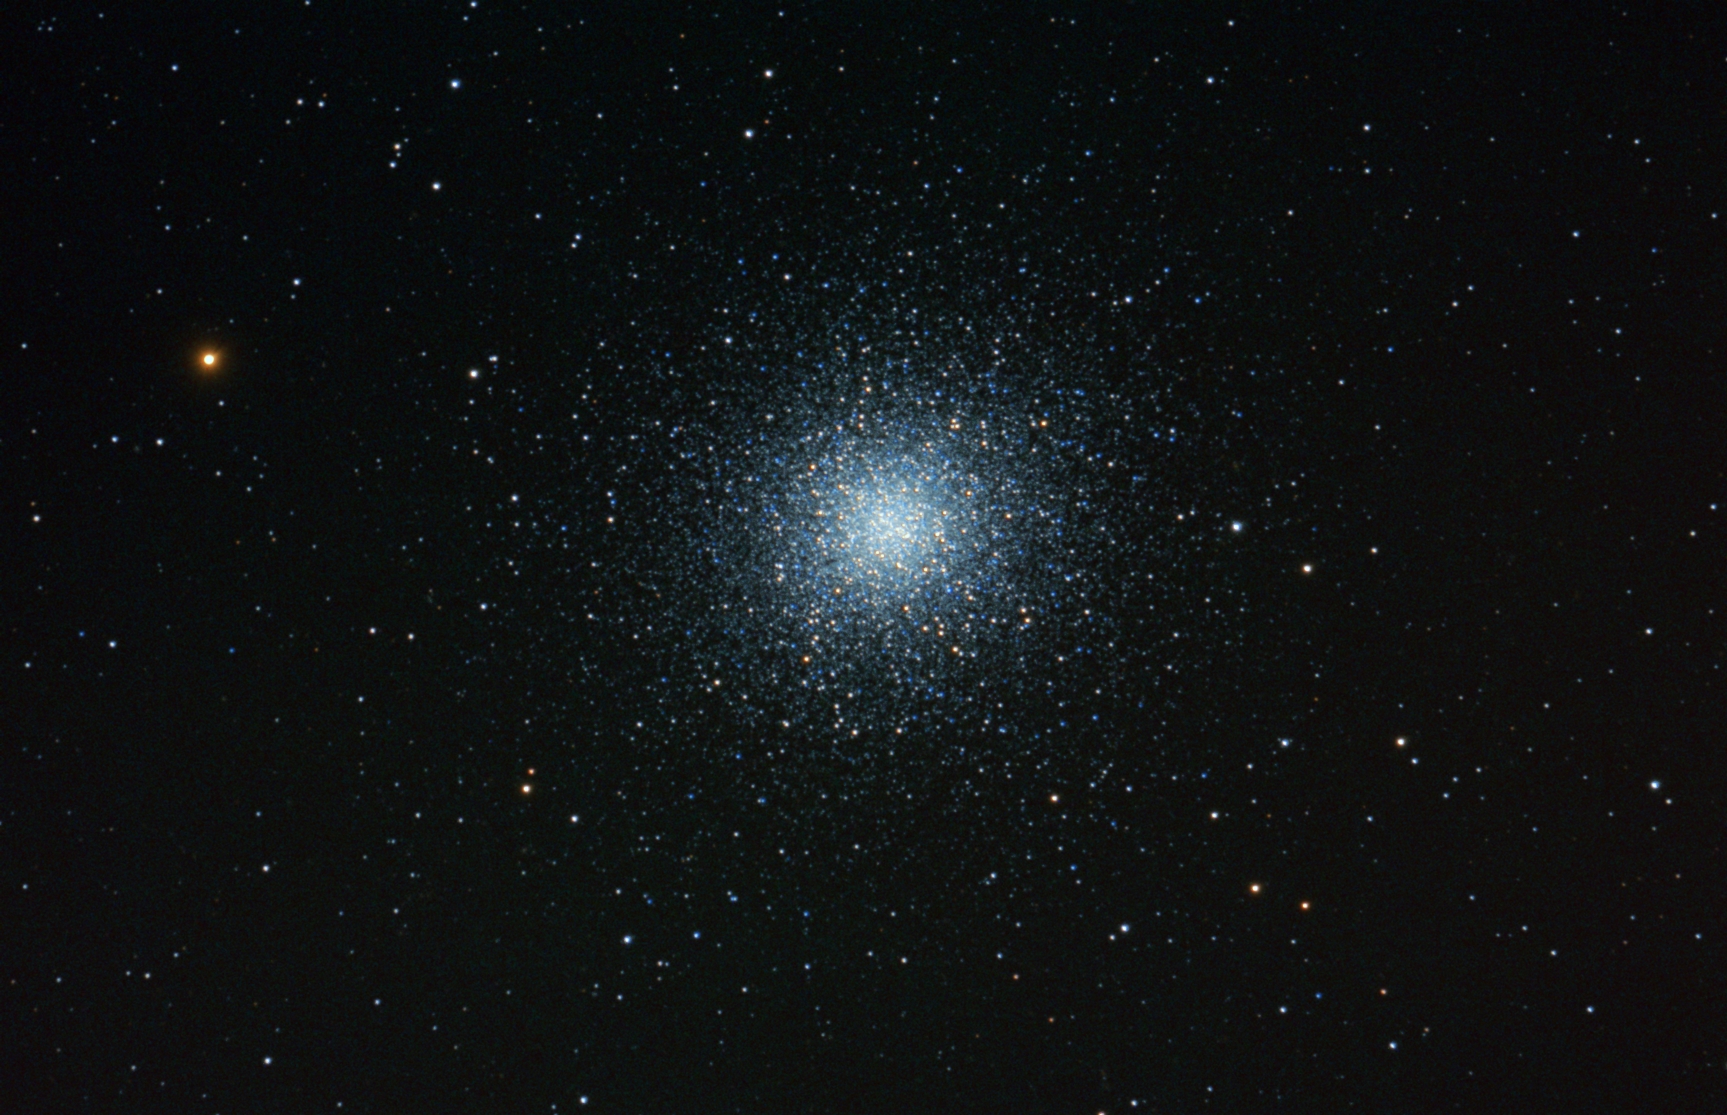
Final ArcSinH stretched image with color decompression ready for further background smoothing, deconvolution, and fine color adjustment as needed.
 |
Copyright © 2013 MLUnsold Digital Imaging. All Rights Reserved.