Focus quality tracking and correction operates the same for Canon, Atik, ASCOM, QSI, and SBIG cameras. This example uses screen shots from Canon and QSI cameras but the procedure is the same for Atik, ASCOM, and SBIG cameras.
Focus quality tracking and correction is used to track the change in focus during a sequence of long exposures and make an optional focus correction between exposures. Focus quality tracking can be used without an ASCOM absolute position electric focuser. Focus correction requires an absolute position ASCOM focuser with or without temperature sensor and uses the auto v-curve focus parameters setup on the Focus tab of your DSLR or
CCD camera.
If your ASCOM focuser does not have a temperature sensor then focus correction is based on the change of a star's half flux diameter or HFD only. If your ASCOM focuser has a temperature sensor then both the change of a star's HFD and temperature change are used to determine if a focus correction is need.
Using Focus Quality Tracking Without an ASCOM Focuser
- Select the Graph option in the Focus Tracking group on the Capture tab then define an exposure sequence.
- After the first image downloads and is displayed select an isolated star to use for focus tracking. A dimmer star that is not saturated and with a HFD ~= 2.0 - 4.0 when using a CCD or HFD <= ~6.5 when using a DSLR is a good choice.
- After each image downloads and is displayed the HFD of the same star is measured and shown in the focus quality list at the bottom of the Capture tab.
- If the HFD of the test star grows too large then the scope needs to be refocused manually.
Using Focus Quality Tracking & Correction With an ASCOM Absolute Position Focuser
- The Graph option can be used for focus quality tracking without correction. The HFD is tracked and also the temperature if your ASCOM focuser has a temperature sensor.
- Select the Correct option in the Focus Tracking group on the Capture tab.
- Select Focus In or Focus Out from the Temperature Drop Correction group. You will first need to determine if your scope focuses in or out as the temperature drops.
- Define an exposure sequence using the Add button on the Capture tab then start the sequence. Use auto focus parameters that match your exposure parameters. For a DSLR use similar ISO. For a CCD use the same bin size.
- Use the auto focus function on the Focus tab to focus the scope then press the Release or Expose button to start the image sequence.
- After the first image downloads and is displayed select an isolated star to use for focus tracking. A dimmer start that is not saturated and with a HFD ~= 2.0 - 4.0 when using a CCD or HFD <= ~6.5 when using a DSLR is a good choice.
- After each image downloads and is displayed the HFD of the same star is measured and shown in the focus quality list at the bottom of the Capture tab. If your focuser has a temperature sensor then temperature information is also displayed. Only temperature information is needed from the ASCOM focuser while focus quality correction is in use so temperature compensation must be turned off at the ASCOM focuser.
- The Target HFD, dHFD, dTemp, dEccen, and Force Correction parameters allow you to tune the focus correction.
- Target HFD is the initial HFD of the selected star. The HFD of the test star from each image is compared to the target HFD to determine if a focus correction is needed. If an image has an HFD measurement of the test star that is smaller than the target HFD then the minimum HFD is used as the target HFD.
- dHFD defines the upper limit of the change of HFD between the current test star and Target HFD. For example,
Current Test Star HFD <= Target HFD + dHFD
is an allowable change in HFD. Select dHFD a little higher than the upper limit caused by changes in seeing. If your focuser has a temperature sensor then dHFD is also set to the change in HFD caused by a change in temperature defined by dTemp. The default value of dHFD is 0.75.
- dTemp is used to define the upper limit of the change in temperature from the Target HFD. If the temperature change of the current image and its test star dHFD are over limit then a temperature correction is applied before the next exposure.
- dEccen is used to define the upper limit of the change in eccentricity or shape of the test star eccentricity. dEccen is used to help determine if an auto tracking error has occurred and not a focus shift.
- Force Correction is used to apply a focus correction at the end of the current exposure even if dHFD or dTemp are within limit.
- Auto focus parameters are setup using the Focus tab and should match the exposure sequence parameters. For example, use the same ISO or bin size auto focus parameters as used for the exposure sequence. Auto focus parameters are assigned to an exposure sequence using the Add button on the Capture tab. See DSLR or
CCD for detailed examples of auto focus parameter setup and use.
A detailed step-by-step example of focus quality tracking and correction using a Canon T1i and QSI 583ws with Optec TCF follows. The procedure is the same for Atik, ASCOM, and SBIG cameras.
Step 1
- From the main ImagesPlus menu open Camera and connect to the CCD or DSLR camera.
- From the main ImagesPlus menu open Focuser | ASCOM Focuser... and select your absolute position focuser.
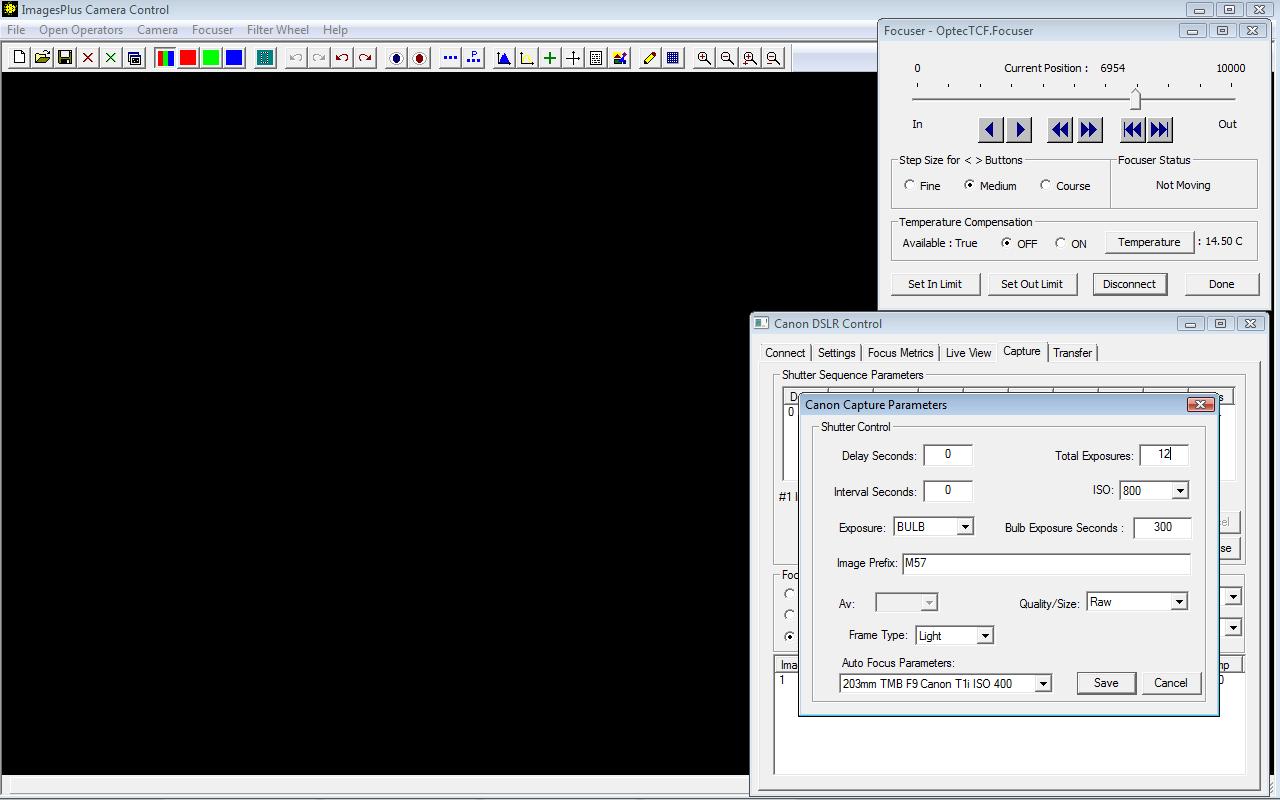
- Add an exposure sequence to the Capture tab by pressing the Add button.
- Select auto focus parameters that match the exposure parameters and scope. For a DSLR use similar ISO. For CCD cameras use the same bin value.
- Press Save to enter the exposure sequence in the sequence list of the Capture tab.
Canon exposure sequence setup. ISO auto focus parameter is similar to the exposure ISO.
 |
QSI CCD exposure sequence setup. Bin auto focus parameter is set to the same bin used by the exposure sequence.
 |
Step 2
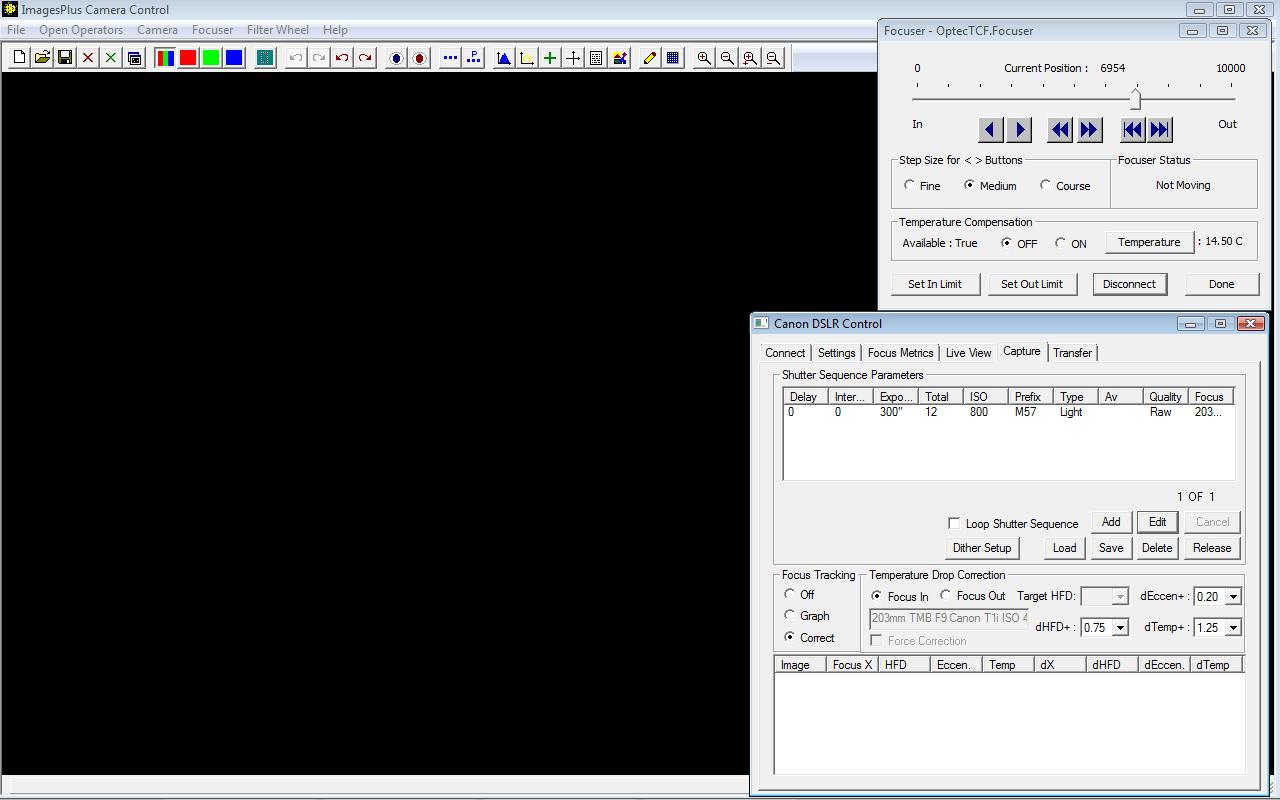
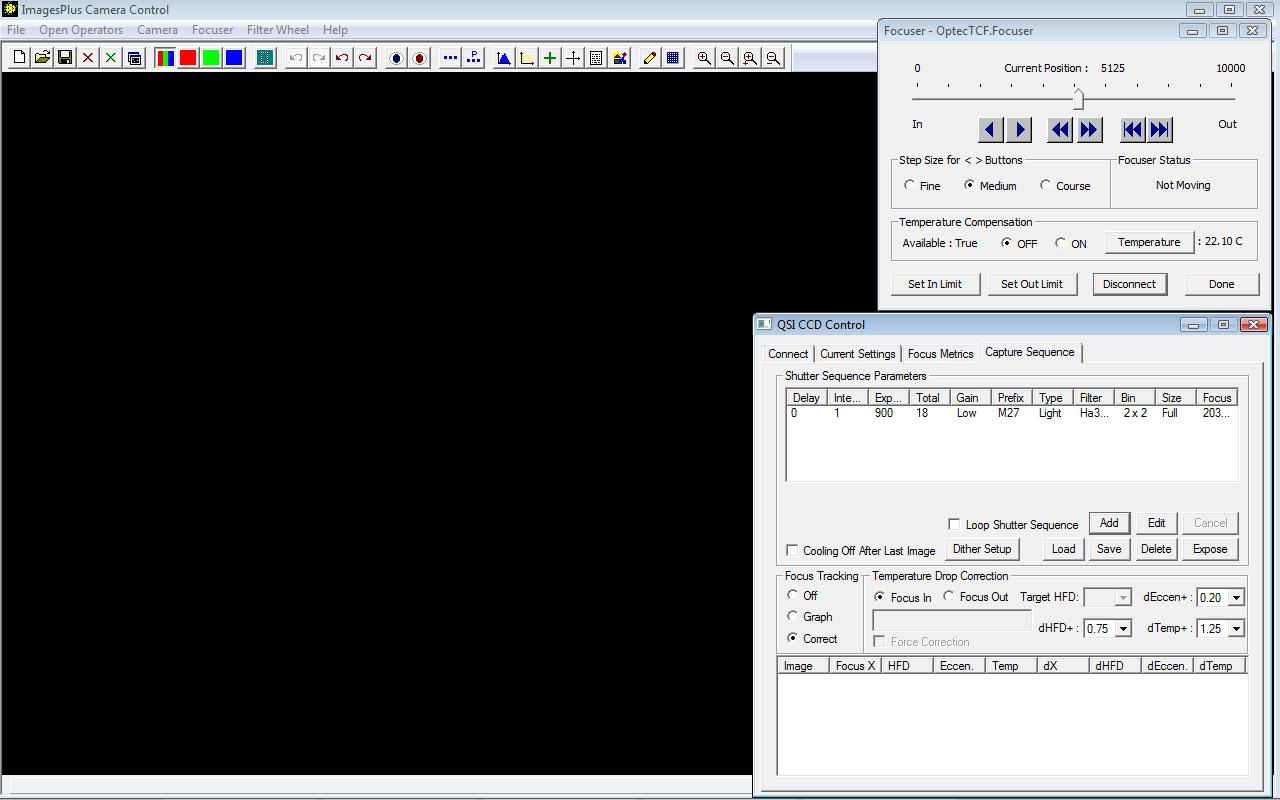
- Select Correct in the Focus Tracking group. The change in HFD of a test star selected from the first image of the sequence will be used to determine if a focus correction is needed. If the focuser has a temperature sensor then change in temperature is also used to determine a focus correction.
- The default values of dHFD = 0.75 and dTemp = 1.25 are used. So a star's diameter can grow by 0.75 and temperature can change by 1.25 C before a focus correction is made using the auto focus parameters.
- Select Focus In or Focus Out from the Temperature Drop Correction group.
A sequence of 12 x 300 second exposures in raw format with ISO 800. Auto focus parameters match the scope F ratio with similar ISO when using a DSLR.
 |
A sequence of 18 x 900 second 3nm Ha exposures bin 2 x 2 with low gain. Auto focus parameters match the scope F ratio and bin used by the exposure sequence.
 |
Step 3
- Press the Release or Expose button to start the sequence.
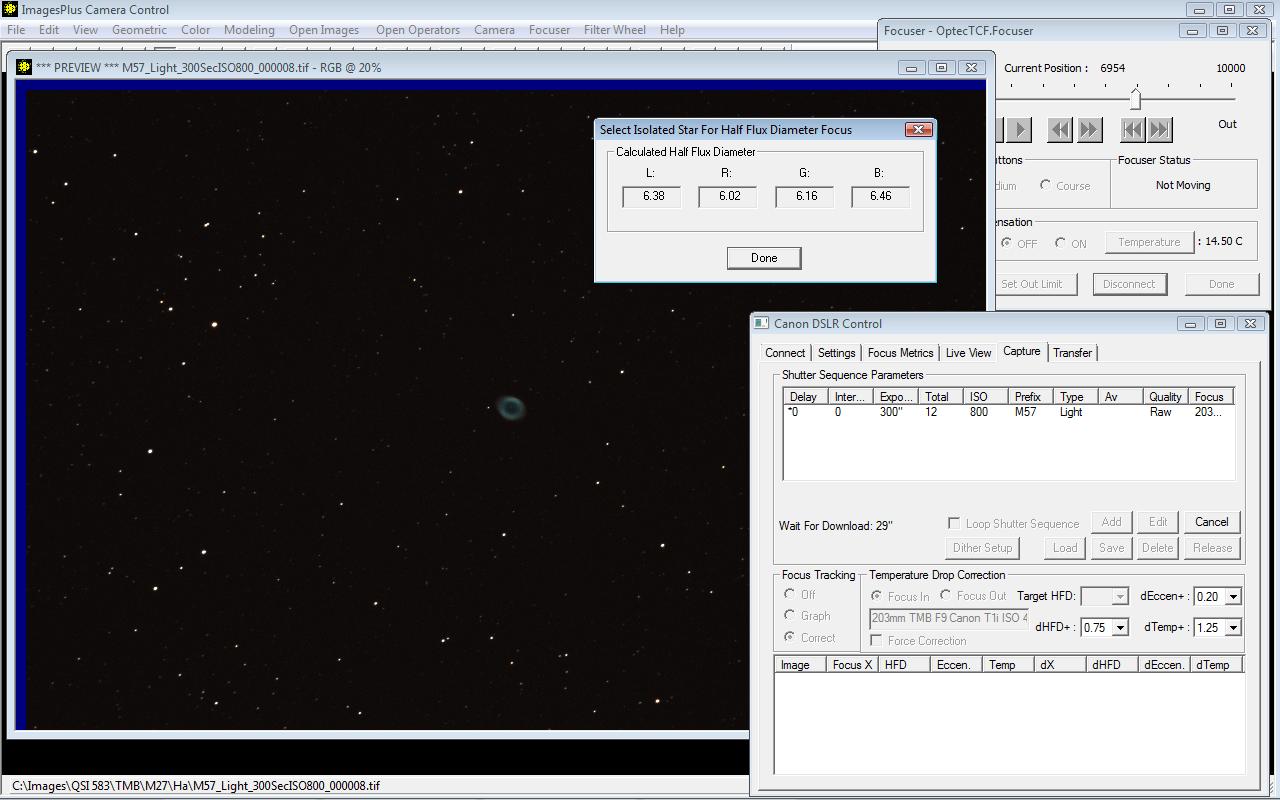
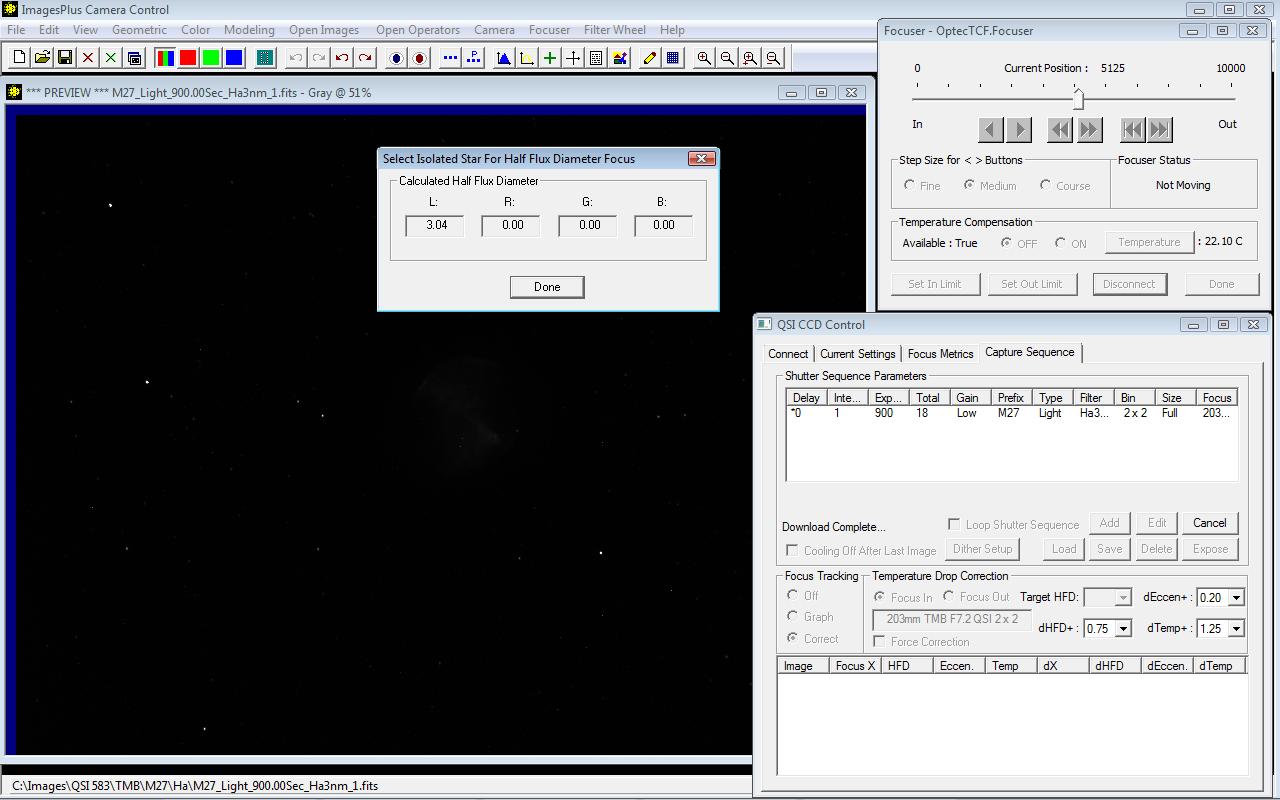
- After the first image is displayed select an isolated star to use for focus quality tracking. For a CCD a star with HFD <= ~3.5 or 4.0 is a good choice. Use a star with HFD <= ~6.5 when using a DSLR.
After the first image is displayed select a star to use for focus quality tracking. Use a smaller isolated star that is not saturated.
 |
After the first image is displayed select an isolated star to use for focus quality tracking. Star's are smaller when using the 3nm OIII filter.
 |
Step 4
- The initial focus position X, HFD, Eccentricity, and temperature if available are saved.
- The HFD of the initial test star is used as the target HFD. If temperature is available when the first image is displayed then it is used as the target temperature.
- The default values of dHFD = 0.75 and dTemp = 1.25 are selected. After each image in the sequence is displayed the same test star is measured and its HFD and temperature are compared to the target HFD and target temperature. A focus correction is made if the current test star's HFD or temperature have changed more than dHFD and dTemp from the target HFD and target temperature, respectively.
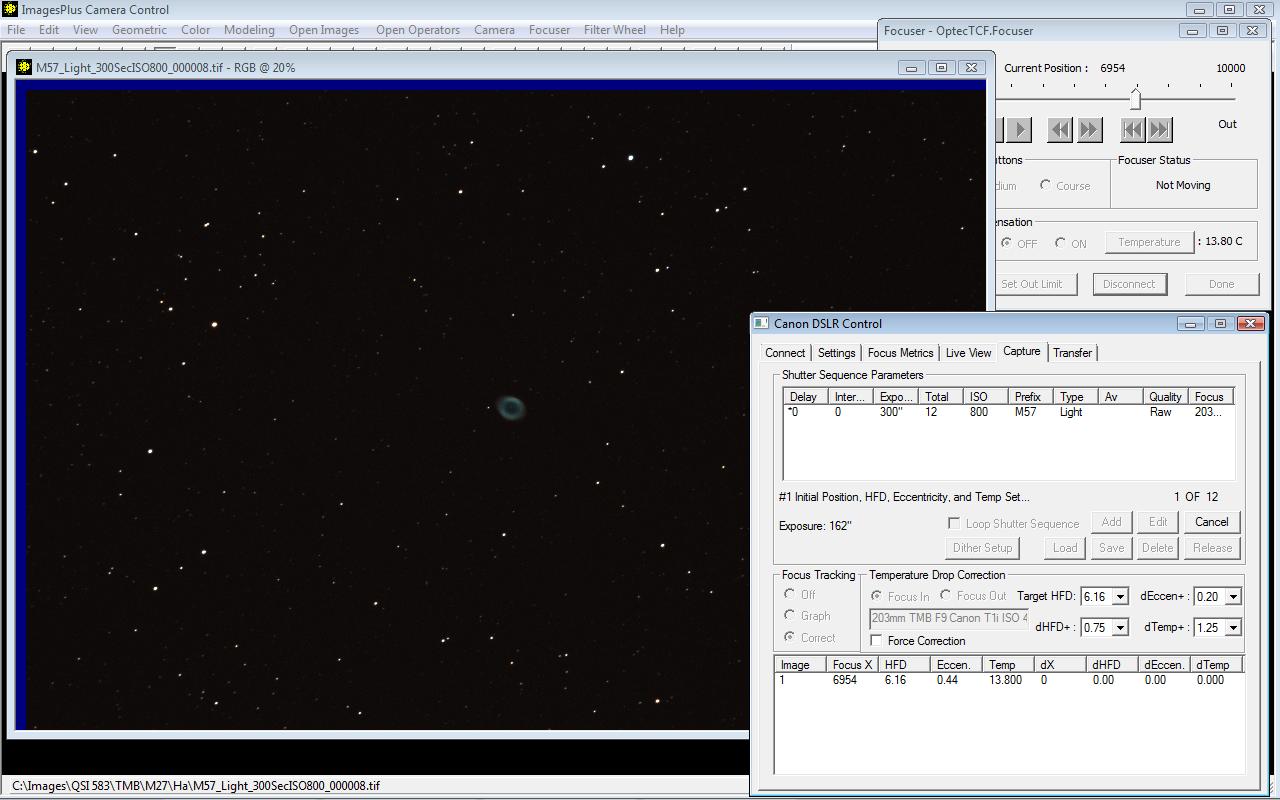
The first image of the sequence has focus position X = 6954, test star HFD = 6.16, Temperature = 13.80 C, and Eccentricity = 0.44.
 |
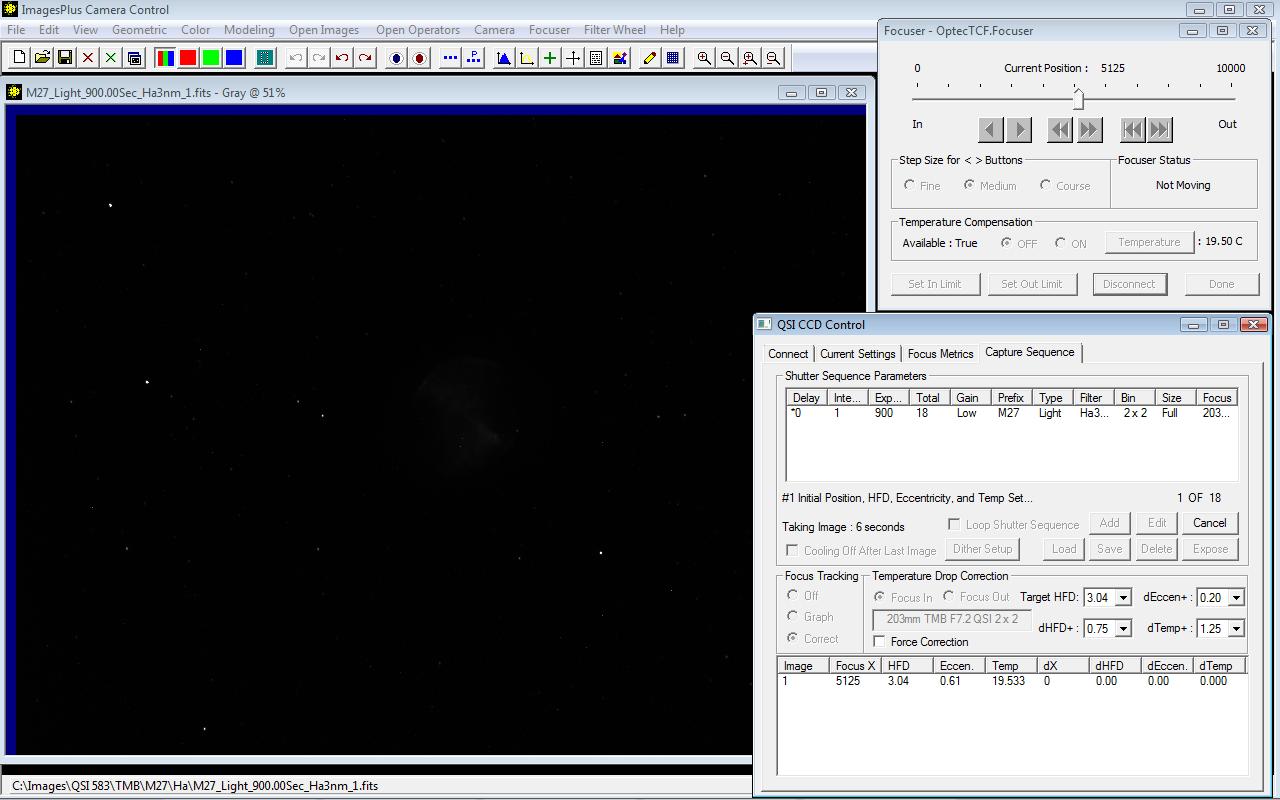
With the QSI 583 the first image of the sequence has focus position X = 5125, test star HFD = 3.04, Temperature = 19.53 C, and Eccentricity = 0.61.
 |
Step 5
- After each image of the sequence is displayed the test star's HFD, eccentricity, and temperature are measured and displayed in the focus quality tracking list.
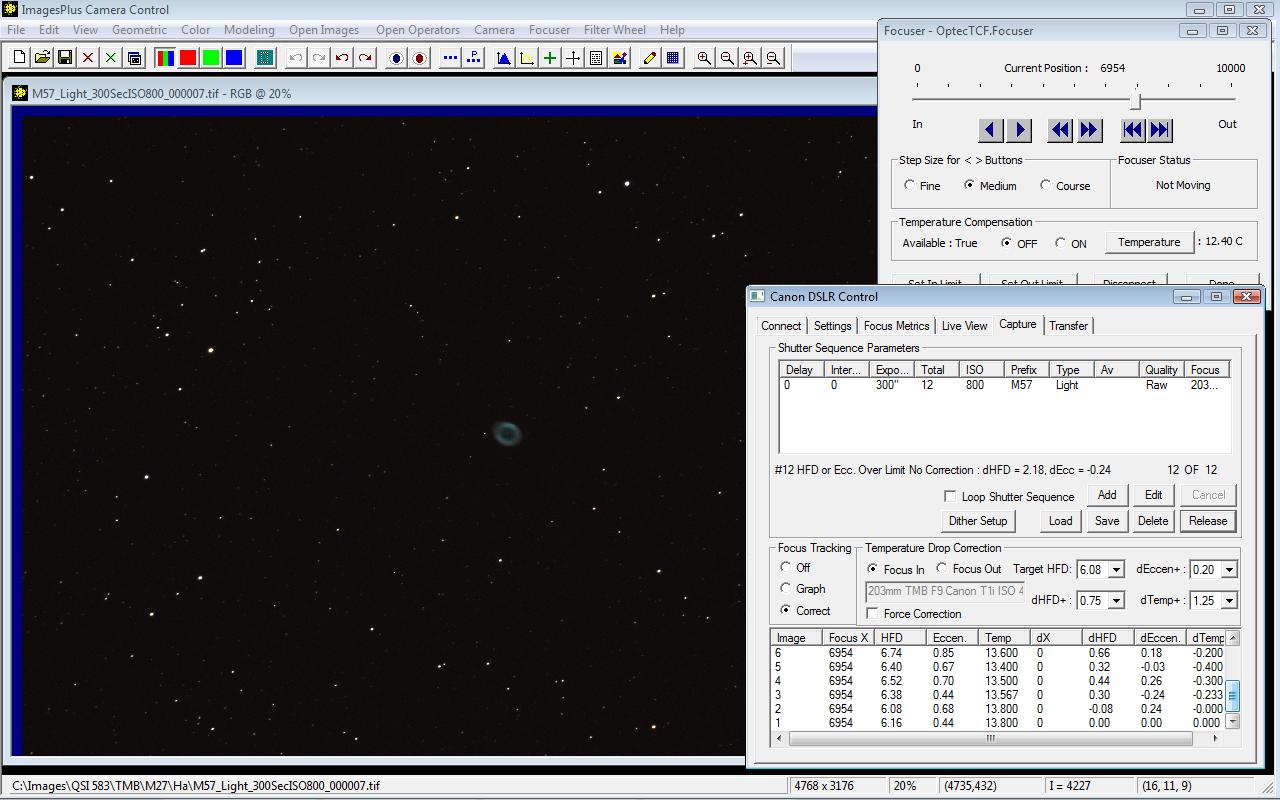
- A focus correction is made if the current test star's HFD or temperature have changed more than the Target HFD + dHFD and target temperature + dTemp, respectively. For example, after the sixth image no focus correction was made since Target HFD + dHFD = 6.08 + 0.75 > current HFD of the sixth image = 6.74 and Target tmperature - dTemp = 13.80 C - 1.25 C < current temperature of the sixth image = 13.60 C.
NOTE : Target HFD is always set to the minimum HFD of the sequence and target temperature is set to the temperature when the minimum HFD was recorded. In the example below Target HFD = 6.08 from the second image and target temperature = 13.80 C.
No focus corrections were made after the first 6 images of the sequence since the test star HFD and temperature did not change by more than dHFD = 0.75 and dTemp = 1.25 C from the target HFD = 6.08 and target temperature = 13.80 C.
 |
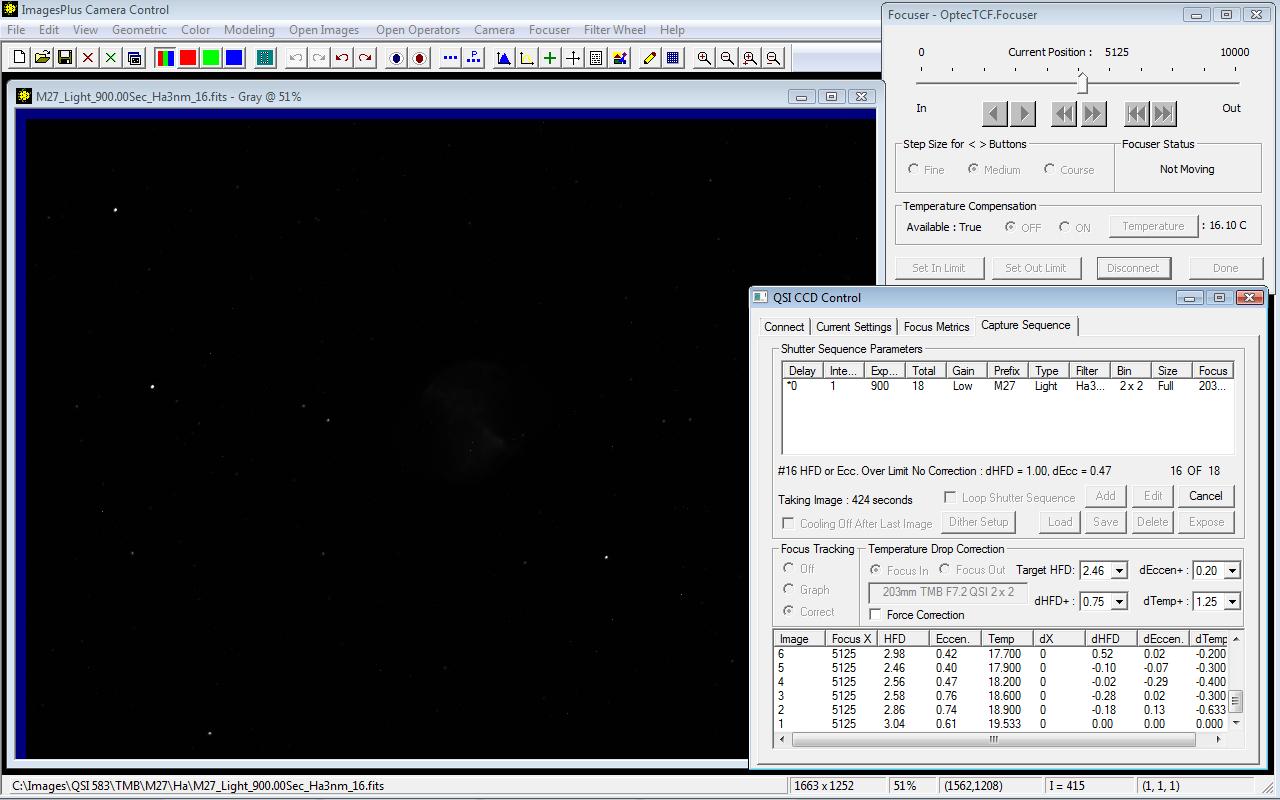
With the QSI 583 no focus corrections were made after the first 6 images of the sequence since the test star HFD did not change by more than dHFD = 0.75 from the target HFD = 2.46. But temperature did change from 19.53 C for the target HFD to 17.7 C for image 6.
 |
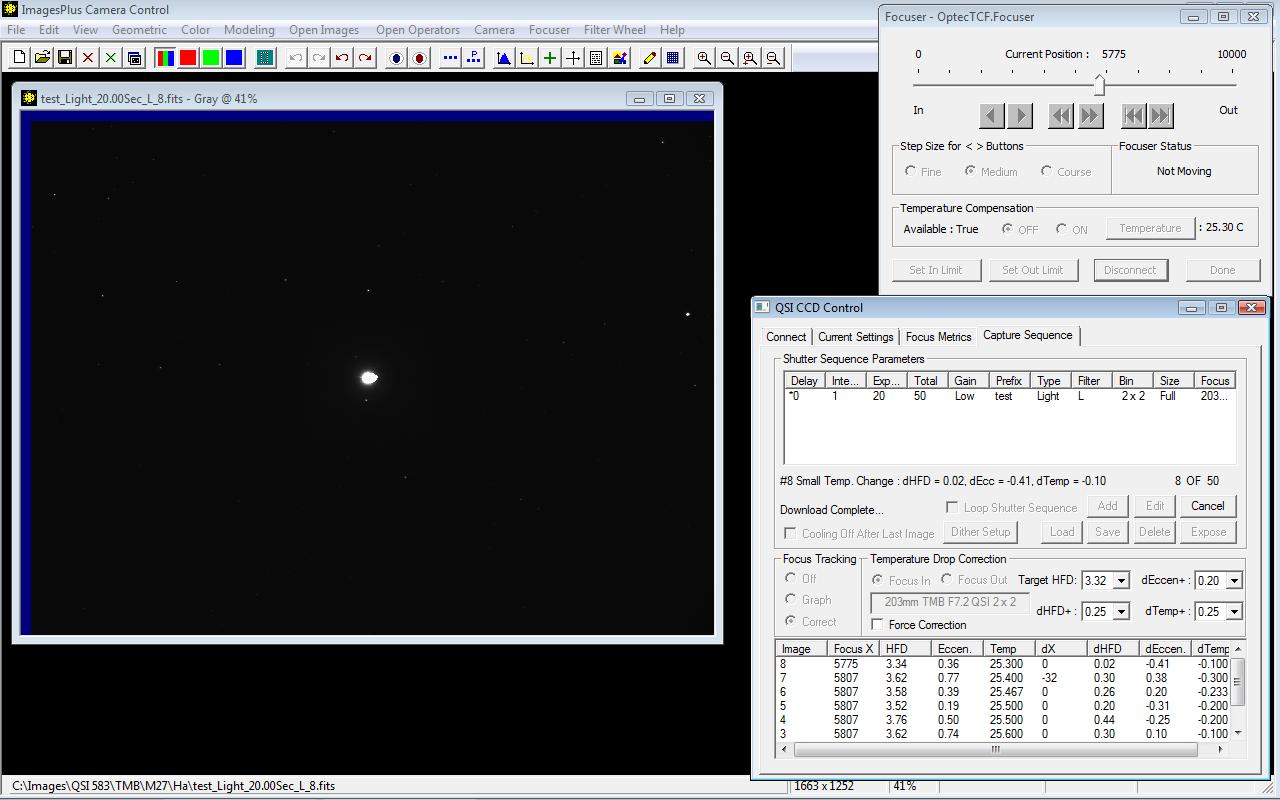
With this sequence using the QSI 583 a focus correction of -32 or focus in 32 steps was made after the first 7 images of the sequence since the test star dHFD = 0.30 > target HFD = 0.25 and dTemp of image 6 = -0.30 which is over the temperature change limit dTemp = 0.25.
 |
Copyright © 2010 MLUnsold Digital Imaging. All Rights Reserved.


